What Is Chinking?
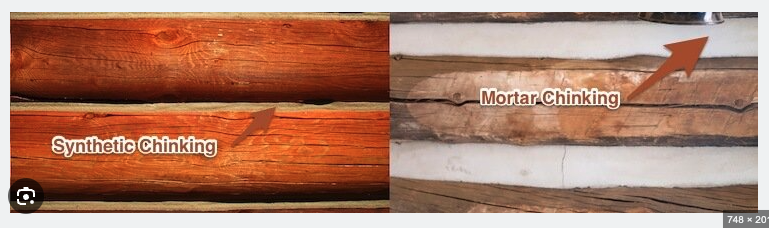
Chinking is a flexible sealant applied between logs to seal the gaps and joints in a log wall system. It prevents air leaks, water intrusion, and pest entry, and must remain flexible enough to accommodate the natural expansion and contraction of logs through seasonal changes. Modern chinking products (like Perma-Chink or Sashco) are synthetic elastomeric materials, but older homes may have Portland cement-based mortar or oakum, which are far less flexible.
Key Defects to Identify
When inspecting chinking, focus on these primary failure modes:
-
Adhesion failure — chinking pulling away from one or both log surfaces, creating gaps at the bond line
-
Cracking or splitting — surface cracks indicating the material has dried out and lost flexibility
-
Missing or incomplete coverage — areas where chinking was never applied or has completely deteriorated away
-
Hardening — loss of flexibility, meaning the chinking can no longer move with the logs as they expand and contract
-
Incorrect product — use of silicone-based caulk (which won’t adhere to wood long-term) or other substandard materials
- Incompatible materials — Example: Water-based finish coating with solvent-based synthetic chinking causing separation
Where to Focus
Certain areas are more prone to chinking failure and deserve extra attention:
-
Corners and intersections — chinking commonly pulls away at corner joints
-
South and west walls — UV exposure accelerates deterioration of both chinking and finish coatings
-
Around windows and doors — caulking at frames is a frequent source of water-related problems
-
Lower courses (sill logs) — these are subject to splashback and ground moisture
-
Log ends extending beyond overhangs — exposed end-grain absorbs water aggressively, and adjacent chinking often fails first
Inspection Technique
Start by standing back from each wall to identify general patterns of wear, then move in for close-up evaluation. Run through each wall individually using a systematic approach:
-
Visually inspect all chinking joints for cracks, gaps, and separation.
-
Check adhesion by gently pressing on the chinking — it should feel flexible and firmly bonded to both log surfaces.
-
Look for evidence of moisture intrusion behind chinking: water stains, soft spots, discoloration, or musty odors on the interior.
-
Note whether backer rod was used behind chinking joints — proper installation uses foam backer rod to prevent three-point adhesion and allow flexibility.
-
Use a moisture meter on logs adjacent to suspect chinking to check for elevated moisture content.
Reporting Considerations
InterNACHI’s log home inspection guidance specifies documenting chinking type and condition as part of the inspection. When writing narratives for your templates, consider including:
-
General chinking material type (synthetic elastomeric, mortar-based, etc.)
-
Overall condition rating per wall elevation
-
Specific defect locations referenced to a wall diagram or photos
-
Evidence of previous repairs and their quality
-
A recommendation for a log home specialist when widespread failures are found, since chinking replacement and log restoration are specialized trades
Keep in mind that inspection is limited to readily visible components at the time of inspection. Hidden decay behind intact-looking chinking is a real risk, especially in high-humidity environments where moisture can become trapped inside logs beneath impermeable finish coatings. Disclaim what you cannot see, and recommend further evaluation by a log home specialist when warranted.