t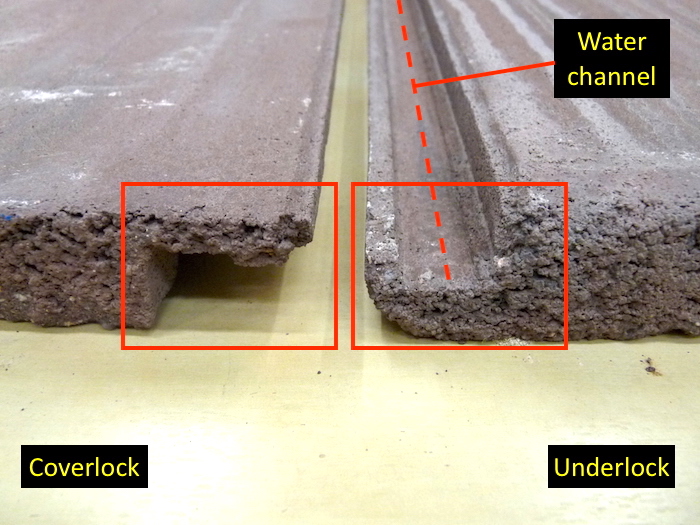
LEFT: Tiles are thinnes at the coverlock, Watch for damage and don't step on them.
RIGHT: Always step on headlaps to avoid breaking tile. Older tiles are more fragile.
NOTE: Concrete roof tile in housing developments in which the HOA requires annual pressure washing will typically suffer shortened lifespans due to tile surface erosion.
Photos
- Photograph all roof slopes. This is for reference. Include at least one in your report. Photos taken from low, looking up, or photos taken across the roof, are better than photos taken from the ridge.
- Take photos of roof sections approx. 2’x3’ that show the average condition of the roof. If it varies with roof slope, shoot however many you need to record the different conditions.
- Photograph examples of defects (including sealant instead of flashing). Newbies tend to shoot too close. You need to be back far enough for visual reference but close enough to see the defect details.
- Hold the camera horizontal or vertical, don’t tilt to the angle of the roof.
Start at/near the eve. Walk parallel to the eve. Look at sections of roof as you go, areas approximately 10’x10’. Check the gutters as you scan the roof. Look for:
Installation
UP Codes: free access
- Minimum slope/Underlayment
- 4&12 with #30 felt (2015 IRC table 905.1.1);
- 2½ &12 to < 4&12 req. dble layer underlayment (19” overlap) (2015 IRC table 905.1.1);
- 4&12 with #30 felt (NRCA);
- 4&12 with #30 felt (TRI);
- 3&12 to < 4&12: 1 layer 90lb. or 2 layers #30 felt (TRI);
- 2½ &12 to < 3&12: req. built-up roof or single-ply membrane (TRI).
- Closure or birdstop at eave.
- 3” minimum headlap;
- Overhang:
- at eve: 1½ inches
- at rake: 1 inch
- Fastening schedule;
- Special fastening: 2015 IRC 905.3.6
- 3 courses or not less than 36” from eaves, rakes or either side of hips or ridges.
- Field tiles:2015 IRC Table 905.3.7
- Solid sheathing, no battens: one per tile;
- Spaced/solid, with battens < 5&12:none required;
- Spaced, no battens:
- 5&12 < 12&12: 1 per tile, every other row
- 12&12 < 24&12 : 1 per tile
- 2½ &12 to < 3&12: (TRI)
- Special fastening: 2015 IRC 905.3.6
- Fastener/stand-off penetrations for roof-mounted equipment;
- Ice dam protection;
Condition
- Broken, chipped, cracked, punctured
- Misaligned
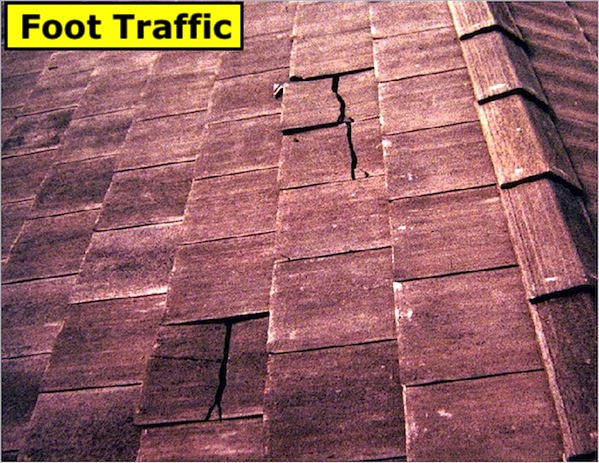
- Displaced tile (slipped or displaced by wind or foot traffic)
- Efflorescence
- Biological growth
- Failed bond of field or cap tiles
- Valley blockage
- Debris accumulation
Flashing (installation and condition)
- All sidewall base- and counter-flashing
- Flat tile: step-flashing
- Medium/high profile tile: continuous flashing with water channel
- All headwall base- and counter-flashing
- Lead flashing to conform to tile profile;
- Flat flashing should have a foam, metal, or mortar closure
- Proper penetration flashing;
- Plumbing vent pipes: proper installation and rubber boot condition.
- Combustion vents;
- Attic ventilation devices should have screens;
- Dryer vent;
- HVAC intake and exhaust;
- vents (bathroom, laundry exhaust fans, etc.);
- Chimney base- and counter-flashing;
- Cricket valleys;
- Electrical mast
- Valley flashing
- Identify type of valley (open or closed);
- Comment on any roll roof open valley linings;
- Check the potential for cross-wash.
- Kickout flashing with sealant;
- Roof-edge flashing
If you can’t/don’t walk the roof
- Get photos of as many slopes as possible. You can see more of the roof from farther away. Rest your camera on/against something stable and zoom in.
- Get medium and close-up shots however you can.
- View the roof from a ladder at the roof edge, other parts of the home, hillsides or any other vantage point you can find.
- Try using binoculars even from the roof edge.
- Consider using a telescopic pole to take photos of portions of the roof that are difficult to see. Some inspectors are now using drones with cameras attached.