For a log home, the floor structure inspection is mostly conventional floor-framing practice plus a few log-specific checks: log diameters/copes, settlement detailing, and moisture/rot exposure at sill and support points.
Scope and Access
- Define what you can see: exposed basement/crawl, finished lower level, covered log beams, etc., and note limitations in the report.
- Use a strong light and probing tool at sill logs, log beams, and any visible log joists; these are the highest-risk elements for concealed decay.
Log-Specific Structural Details
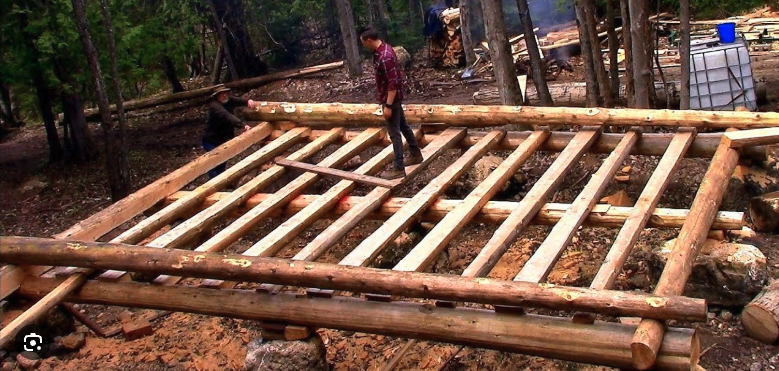
- Verify that log floor joists (or log beams supporting a framed floor) bear at least one full course above the supporting wall; log engineering guidance calls for log floor joists to be one-half course above the supporting log wall so the bearing and load path are consistent around the structure.
- Where log joists/rafters meet a log beam, confirm that the carried member is coped over the supporting log rather than the beam being notched; the engineering guidance is that you do not notch the supporting beam for the reaction, you notch the member being supported.
- Look at relative diameters: structural log members (beams, joists, rafters) should typically be within about 2-3 inches of the wall log diameter; undersized joists relative to wall logs can indicate under-engineered floors.
Conventional Floor-Framing Checks (Applied to Log Systems)
Even when the main members are round logs, you still apply standard floor-framing logic.
- Joist support: look for adequate bearing at sill logs, interior girders, and pockets; watch for crushing, splits at notches, or sloping/sagging indicative of over-span.
- Over-notching: where a log joist or beam is let into a support, check that the remaining section is substantial; deep housing into round logs removes a lot of section quickly and can reduce capacity.
- Deflection/sag: walk test and sight along the underside; excessive bounce or visible sag between supports may indicate spans beyond what the log diameter and grade can reasonably carry, especially if diameters are small per the engineering tables.
- Connections: look for through-bolts, lag screws, or log screws at bearing points; poorly fastened bearing points, checks running through supports, or split log ends at supports are red flags.
Settlement and Differential Movement
- Identify any screwjacks at posts, under beams, or in framed support walls; log-engineering practice is to accommodate shrinkage/settlement with adjustable jacks at non-shrinking supports like posts, fireplaces, and CMU walls.
- Check for evidence of unrelieved settlement: gaps at beam-to-post interfaces, crushed blocking, tilted posts, or partition walls hung up under floor framing instead of slipping.
- Where a log floor system frames into non-settling construction (CMU walls, steel or conventional wood moment frames, framed interior walls), look for slip joints or other detailing that allows log walls/floor to move without pushing or hanging up the rigid elements.
Moisture, Decay, and Insects at Floor System
- Sill log at grade: confirm clearance from grade (target 12 inches or more) and look for splashback staining, fungal growth, moss, or soft ends; log inspection checklists flag corners, log ends, and upward-facing checks as prime decay locations.
- Crawl/basement environment: assess ventilation, moisture, and any plumbing leaks above log beams or joists; probe at checks, end grain, and bearing points where repeated wetting occurs.
- Interface details: at the sill log/floor assembly joint and any flashing over foundation, look for failed flashing, sealants, or chinking that could allow chronic wetting of the sill and first course supporting the floor.